Deadlift Setup: The 4 Checkpoints Before Every Pull
A 4-checkpoint deadlift setup checklist that protects your back before every pull: bar position, grip, lats, and brace, in under 10 seconds.
Most deadlift injuries don't happen mid rep. They happen before the bar leaves the floor, because the setup was wrong and the back paid for it.
The fix is not more mobility work or a lighter bar. It is a 4-checkpoint deadlift setup you run before every single pull. Same order. Every time. No exceptions.
How do you set up for a deadlift?
Set up for a deadlift in four steps: place the bar over your midfoot, hinge down and grip just outside your shins, pull your lats tight and take the slack out of the bar, then take a big breath and brace your core before pulling. The whole sequence takes under 10 seconds.
That is the short version. Here is each checkpoint in detail, and why skipping any one of them puts your lower back on the line.
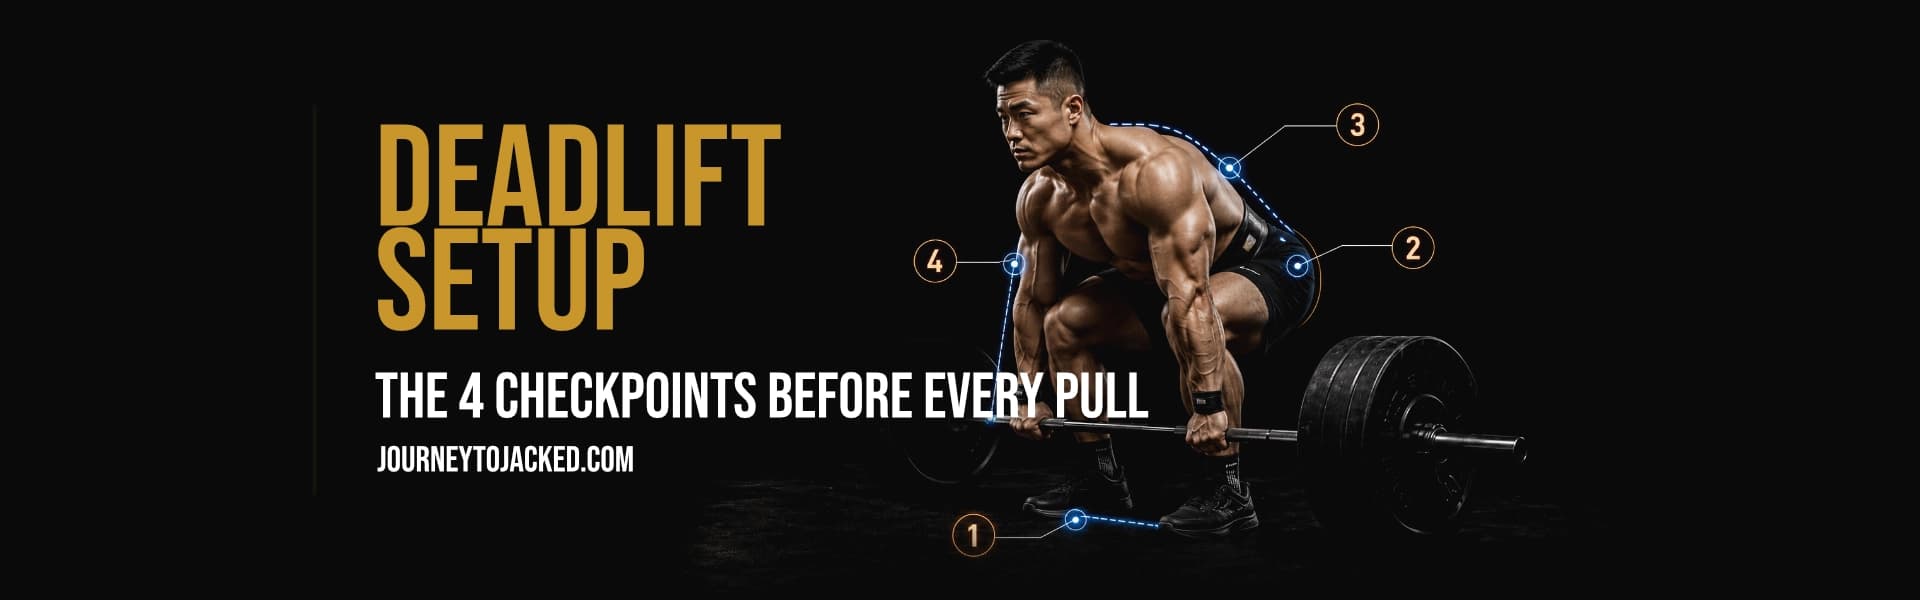
Checkpoint 1: Bar Over Midfoot
Stand with the bar over the middle of your foot. Not against your shins. Not over your toes. Midfoot.
This matters because the bar wants to travel in a straight vertical line over your balance point. Biomechanical analysis of the deadlift shows lifters are strongest when the bar stays close to the body throughout the pull 1. Start it forward of midfoot and the bar drifts away, your hips shoot up, and your lower back becomes the lever.
The check: Look down. The bar should cut across your foot where your shoelaces start. About one inch from your shins.
Checkpoint 2: Hinge, Grip, Shins to Bar
Push your hips back and grip the bar just outside your legs. Do not squat down. Hinge.
Then bring your shins forward until they touch the bar. Do not roll the bar to your shins. Bring your shins to the bar. The bar does not move from midfoot. Your body arranges itself around it.
The check:
- Hands just outside your shins
- Shins touching the bar
- Hips higher than your knees, lower than your shoulders
- Eyes on the floor a few feet ahead, neck neutral
If your hips are too low, you are squatting the weight and the bar will swing forward. If they are too high, your back does all the work. Find the middle.
Checkpoint 3: Lock the Lats, Pull the Slack Out
This is the checkpoint most lifters skip, and it is the one that saves your back.
Squeeze your armpits like you are crushing oranges in them. That locks your lats and connects your arms to your torso. Then pull up on the bar until you hear it click against the top of the plates. That is the slack coming out.
Pull slack with a loose back and the bar jerks off the floor. The jerk lands on your spine. Pull slack with locked lats and the bar leaves the floor under tension, smooth and controlled.
The check: Chest up, lats tight, bar clicked against the plates. You should feel tension through your whole body before the bar moves an inch.
Checkpoint 4: Breathe and Brace
Take a big breath into your belly, not your chest. Then brace your core like you are about to take a punch.
This is not optional. Breath and brace create intra-abdominal pressure, and research shows that pressure stiffens and stabilizes the spine under load 2. No brace means your spine handles the weight with soft tissue. Brace hard and your torso becomes a cylinder of pressure that the load travels through.
Hold that breath through the rep. Exhale at the top or after you set the bar down. Reset the breath before every pull.
The check: Belly full, core hard, ribs locked down. Now pull.
Why does my lower back round when I deadlift?
Your lower back rounds when you lose tension before or during the pull. The usual causes: the bar starts too far from your body, your hips shoot up because they started too low, you never locked your lats, or you pulled without bracing. All four are setup failures, not strength failures.
That is the whole point of the checklist. Rounding is rarely a weak back. It is a rushed setup. Slow down, run the checkpoints, and the rounding disappears at the weights that used to break you.
If your back also takes over on Romanian deadlifts, the problem is the same hinge pattern. Fix it with this RDL form breakdown.
How long should a deadlift setup take?
A complete deadlift setup should take 5 to 10 seconds once the sequence is learned. Longer than that and you bleed tension and psych yourself out. Shorter than that and you are skipping checkpoints. Run the same four steps in the same order until it becomes automatic.
The setup is also where consistent progress lives. A repeatable setup makes every rep identical, and identical reps are what let you add weight week after week without form falling apart.
The 4-Checkpoint Checklist
Print this. Memorize it. Run it before every pull.
- Bar over midfoot. One inch from your shins.
- Hinge and grip. Shins to the bar. Hips between knees and shoulders.
- Lats locked, slack out. Crush the oranges. Click the bar.
- Breathe and brace. Belly breath. Core like concrete. Pull.
Four checkpoints. Ten seconds. A back that lasts decades.
Your Next Step
Stop guessing. Start building.
Get a personalised training plan built around your body, your goals, and your schedule — ready in minutes, yours forever.
Get Your PlanReferences
Footnotes
-
Escamilla, R. F., et al. (2000). A three-dimensional biomechanical analysis of sumo and conventional style deadlifts. Medicine and Science in Sports and Exercise, 32(7), 1265-1275. https://doi.org/10.1097/00005768-200007000-00013 ↩
-
Hackett, D. A., & Chow, C. M. (2013). The Valsalva maneuver: its effect on intra-abdominal pressure and safety issues during resistance exercise. Journal of Strength and Conditioning Research, 27(8), 2338-2345. https://doi.org/10.1519/JSC.0b013e31827de07d ↩